Musings by Mia – Staycations for Celiacs – ‘Wood-Fired’ Pizza Crusts
 Although summer is over, we still want to explore the world of food from the comfort of home! My partner, a wonderful cook/baker, has been busy developing some tasty gluten free recipes that I am eager to share. This installment of the series is perfect for busy households – a delicious gluten-free pizza feast! Below is a recipe for gluten-free pizza crust. The thin-crust dough is soft and chewy, and my partner uses a cooking method that leaves the crust lightly charred with big air bubbles – as if it just came out of a wood fired oven!
The trick? To cook the dough in a cast iron skillet before topping and putting it in the oven. Using this method means the oven is only needed to melt the toppings – this also means you have the option of freezing pre-cooked (not topped) pizza shells! The recipe below makes 4 pizza shells but can easily be doubled to make 8 shells. We usually make two pizzas to eat, and then freeze the rest of the pizza shells for easy weeknight meals. These shells are great to have on hand and are definitely a cheaper (and tastier) alternative to store-bought, ready-to-top, gluten-free pizza shells.
To make it a true ‘staycation’ meal we recommend making some of your favourite pizzas (margherita, pepperoni, veggie…) and indulging with a glass of wine – and maybe a salad if you’re feeling healthy! Enjoy!
Gluten-Free Pizza Crusts
INGREDIENTS
- 2 Cups (450g) + 3 TBSP Water
- 2 ¼ Cups (500g) Gluten-free flour blend – preferably one containing xanthan gum such as Bob’s Red Mill 1-to-1
- ½ TSP Salt
- ½ TSP Instant dried yeast
INSTRUCTIONS
- Add yeast to 3 TBSP of water and set aside for 5 minutes.
- In a large mixing bowl whisk together flour and salt.
- Add all of the water and yeast mixture to the flour and mix until a consistent dough has formed. Feel free to use a wetted hand, a silicone spatula, or a stand mixer.
- Let the dough sit, covered, on a countertop for 4-6 hours. Alternatively, you could transfer the dough to the fridge and leave it overnight at this stage – be sure to use saran wrap to form a seal over the dough if you decide to leave it in the fridge.
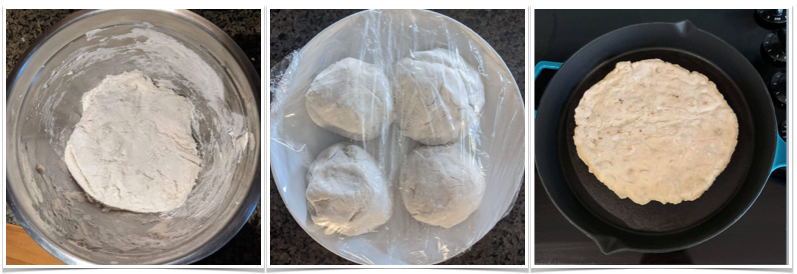
- After 4-6 hours, divide the dough into 4 roughly equal balls and place, covered, on a parchment lined baking sheet to proof again for around 2 hours. The dough should double in size after 2 hours.
Optional step: After 90 minutes, you can transfer the dough balls into the refrigerator for 30 minutes. Including this step will allow the dough to be easier to work with when forming the pizza shells.
- Preheat the oven to 450°C and preheat a pan (preferably cast iron) over medium heat on the stove top.
- To form the pizza shells, heavily flour a piece parchment paper and use your hands to shape a dough ball into a 10-12” circle – aim for just slightly smaller than your pan.
Note: Move the shell around frequently when doing this to ensure it doesn’t stick to the parchment.
- Now for the hardest part of the whole process, take the parchment (with the pizza dough on it) and slide the flattened dough into the preheated pan. It is generally easiest to try to do this in one confident motion, but if it doesn’t work don’t panic. If you end up with a pizza that ripped or folded over itself when you put it in the pan, the best thing to do is take the pan off the heat and either using your hands or an oiled spatula reform the pizza in the pan doing your best to get it to a relatively even thickness.
Cook for 4-6 minutes, or until the bottom is browned and the top is mostly cooked through.
At this point you can freeze the pizza shells for future meals! We recommend freezing the shells separated by a piece of parchment paper to ensure they don’t stick together. To cook from frozen, preheat the oven to 400°C and add your desired toppings. Cook from frozen for 12-15 minutes.
- Take the pizza shell and transfer to a baking sheet and top with your desired toppings before putting it in the preheated oven for 7-10 minutes or until the toppings are evenly cooked.
- Enjoy!
About Mia

Mia enjoys gardening, trying new gluten-free recipes and drinking copious amounts of tea!
- “Musings by Mia is meant to be a collection of topics that I wish had been more discussed when I was first diagnosed with Celiac Disease as a teen. I will explore topics from the perspective of a young adult with Celiac Disease and share my personal experiences in these articles. As these are my own experiences, they are by no means meant to be a ‘how-to’ guide, but instead an informative glimpse into the situations a typical young adult with Celiac Disease might face.”
- If you have questions or comments, or if you have topic suggestions, Mia would be happy to hear from you. Scroll down to the comment field below or email [email protected] with your thoughts.